SCHMIDT® Sensor Adjustments and Sensor Calibrations
Our Services
- Precise flow calibration in our own Calibration Service Center
- In an atmospheric environment
- In the closed pressure reference channel from wN = 1 m/s to wN = 220 m/s
- Measurement of vertical flows for laminar flow sensors
- Factory calibration of InLine volume flow sensors
- Standard precision and high precision adjustment (order option; adjustment of measuring range and accuracy class, e.g. 3% or 1% class [depending on type])
- Calibration certificate (DAkkS accredited calibration(1); only atmospheric for wR = 0.1 m /s to wR = 40 m/s (2)) or factory calibration certificate (for all the other above mentioned measuring ranges) – traceability to national and international standards
- All wind tunnels are regularly calibrated using a Laser-Doppler-Anemometers (LDA)
- Supply of calibrators for checking the measuring sections on site
Calibration contract for cleanroom sensors:
- Incoming inspection (visual and electronically) with „as found” calibration
- Issue of a calibration certificate (DAkkS accredited calibration) (1) or factory calibration certificate
- Sighting and, if necessary, cleaning of the sensor element
- Professional and proper storage in separated stock
- Insurance and goods management
- On-time adjustment and „as left“ calibration with calibration certificate (DAkkS accredited calibration) (1) or factory calibration certificate
- Confirmed delivery date
A service return must always include a fully completed and signed declaration of decontamination so that processing can be started. An RMA number and a form “Declaration of Decontamination of Flow Sensors for Service-Returns” can be requested via sensors@schmidttechnology.de.
Each SCHMIDT® flow sensor is adjusted in a high-precision LDA-calibrated wind tunnel and thereby checked for compliance with the specified measurement accuracy. At the customer’s request, each flow sensor is subjected to a validation in a calibration wind tunnel after completion and the measured values are recorded in a calibration certificate (DAkkS accredited calibration) (1) or a factory calibration certificate. The customer thus receives proof of accuracy for each sensor and can use the sensor in applications that are subject to quality monitoring, for example in accordance with ISO 9001 or GMP.
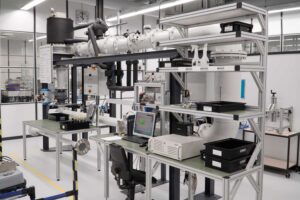
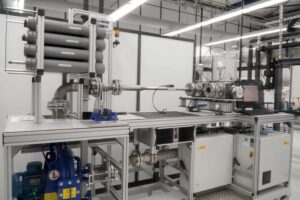
For the preparation of calibration certificates, SCHMIDT Technology has several state-of-the-art wind tunnels at its disposal, in which SCHMIDT® flow sensors are measured fully automatically. The wind tunnels have highly accurate references that are traceable to national standards. The regular inspection of all wind tunnels of our calibration laboratory is subject to SCHMIDT Technology’s internal monitoring in accordance with our QM system according to DIN EN ISO/IEC 17025.
Calibration and competence
The competence of a flow sensor manufacturer begins with the selection of the right wind tunnel. All wind tunnels we use have been carefully planned and optimised precisely for your applications. Every new flow sensor from SCHMIDT Technology undergoes an intensive test programme in the wind tunnel before it is released for the use by the customer. Behind everything lies our company’s profound knowledge of flow mechanics of gases and the physical functioning of our flow sensors.
member of Deutschen Kalibrierdienst

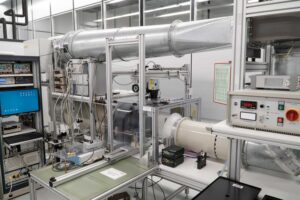
Atmospheric wind tunnels
Very low turbulence and a precise flow profile are the special features of our two atmospheric wind tunnels. The measuring ranges extend from wN = 0.1 m/s to wN = 60 m/s for factory calibrations and from wR = 0.1 m/s to wR = 40 m/s (2) for DAkkS accredited calibrations (1), so that most SCHMIDT® flow sensors can be adjusted and calibrated with these wind tunnels. Even the smallest flow velocities, as they are indispensable in cleanroom applications, can be exactly reproduced with these wind tunnels.
Bi-directional flow sensors for applications in the field of overflow measurement are also adjusted and calibrated on our atmospheric free jet wind tunnels.
K_WK_D255 Free jet wind tunnel with Laser-Doppler-Anemometer (LDA) (1)
K_WK_D320 Free jet wind tunnel
Downstream wind tunnel
Special requirements are set on flow sensors for laminar flow applications such as in isolators, cleanroom workbenches or FFUs. Basic requirements are the process-reliable and reproducible detection of very small vertical flow velocities (0.45 m/s ±20 %), the highest possible measuring accuracy and, if applicable, a fast reaction to changing conditions.
Vertically mounted thermal anemometers generate an inherent convection of 0.05 … 0.1 m/s due to the measuring principle. This upward flow counteracts the downward flow that is actually to be measured, so that an ordinary flow sensor generally indicates 10 … 20 % too little flow velocity. Conversely, the fan speeds are increased and significantly more flow is generated than necessary. Compensation for this deviation is only possible through vertical adjustment in a downstream wind tunnel.
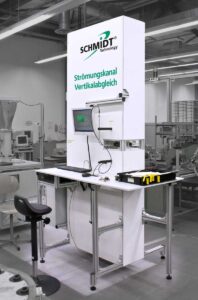
Our aspiration to deliver highly precise flow sensors was the impetus to develop a unique vertical flow wind tunnel. In our world’s only vertical flow wind tunnel, all sensors for laminar flow applications are adjusted and calibrated at the highest technical level. In this way, we guarantee highly precise measurement results and compliance with the required specifications, even with vertical mounting.
F_WK: Downstream wind tunnel (vertical)
Pressurized wind tunnels for insertion type flow sensors and “InLine” mass flow sensors
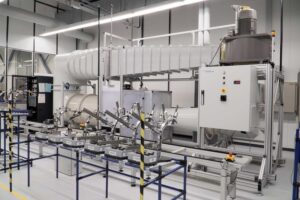
With these wind tunnels, SCHMIDT Technology has two calibration wind tunnels that are unique in Europe. This allows standard flow velocities of up to wN = 220 m/s to be generated and sensors to be adjusted and calibrated under overpressure. High standard flow rates are usually generated by increasing the pressure and not by increasing the real velocity. Therefore, sensors adjusted and calibrated under pressure represent the real applications better than conventionally adjusted sensors under atmospheric conditions.
The superior flow quality of our pressurized wind tunnels allows SCHMIDT® high-speed and mass flow sensors to be calibrated with lowest tolerances.
K_DWK: Pressurized wind tunnel for insertion type flow sensors
- Closed loop system
- wN = 0,15 … 712 m³/h (@ 1 … 6 barg)
- 1 … 6 bar absolute
- Low turbulence
- Drive 3 kW
- Cooling register
K_IWK: Pressurized wind tunnel for “InLine“ mass flow sensors
In addition to the wind tunnels described in detail above, SCHMIDT Technology has further product-specific wind tunnels available. We also have additional development wind tunnels, real gas calibration wind tunnels and other measuring and testing equipment to adequately solve a wide range of measuring tasks.
Factory calibration and accredited calibration (DAkkS accredited calibration) (1)
We offer our flow sensors with a factory calibration as standard and leave it up to you to decide whether you want to have confirmation of compliance with the specifications solely by means of a factory certificate 2.1 in accordance with DIN EN 10204 or whether a factory calibration certificate should be issued. Factory calibrations are often also known as ISO calibrations.
When configuring the flow sensor, you define the required adjustment accuracy. Here you can choose between the two options standard precision adjustment and high-precision adjustment. With standard precision adjustment, a factory calibration certificate can be issued optionally at an extra charge. For high-precision adjustment, a factory calibration certificate is always included.
The applied standards for our SCHMIDT® factory calibrations are firmly anchored in our quality management system. The factory calibrations are also carried out following DIN EN ISO/IEC 17025.
In addition, we offer you the possibility of having our flow sensors calibrated in our calibration laboratory accredited (1) according to DIN EN ISO/IEC 17025. This calibration is confirmed by a corresponding accredited calibration certificate (DAkkS accredited calibration) (1).
Due to the accreditation of our laboratory, we are in constant and close exchange with other accredited laboratories within the framework of the DKD technical committee and work together on the further development of calibration methods and the reduction of measurement uncertainties.
.
PTB/
national standard
.
SCHMIDT®
DAkkS-accredited calibration (1)
(reference standard LDA)
..
SCHMIDT®
Factory Calibration
.
.
Presentation of the different verification options from factory calibration via accredited measurement (1) (DAkkS; formerly known as DKD) to the national institute of metrology, the PTB.
Factory calibration (ISO)
SCHMIDT® factory calibrations are carried out according to defined factory standards. The measuring points, which vary depending on the flow measuring range, are fixed and cannot be determined freely. The selection of the best possible calibration wind tunnel is made by SCHMIDT®. The wind tunnels used for this purpose are all regularly checked and validated with a Laser-Doppler-Anemometer (LDA) calibrated by the PTB (“Physikalisch-Technische Bundesanstalt, Nationales Metrologieinstitut”).
The measurement accuracy defined by the sensor configuration determines the execution of the factory calibration. The conformity assessment of the calibration result is carried out on the basis of the standard decision rule “confidence level 50 %” (in compliance with the guideline RL-ST-200 “Decision Rules and Statements of Conformity”). The calibration result as well can be provided as a factory calibration certificate.
Accredited calibration in accordance with DIN EN ISO/IEC 17025 – DAkkS accredited calibration (1)
DAkkS accredited calibrations (1) can be carried out at SCHMIDT Technology up to a flow measuring range of wR = 0.1 m/s … 40 m/s (2) . As a manufacturer of bi-directional flow sensors, we are able to offer accredited calibrations (1) for bi-directional measuring sensors, too. In a bi-directional DAkkS accredited calibration (1), the same measuring points are applied in both flow directions.
The DAkkS accredited calibrations (1) are realized in compliance with the guideline RL-ST-220 “Accredited Calibration Procedure Thermal Anemometer”.
The following flow sensor models can be calibrated in our accredited flow calibration laboratory (1):
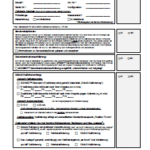
To determine the scope of the DAkkS accredited calibration (1), our Checklist for DAkkS accredited calibrations must be completed and agreed. Following this, you will receive a quotation for the jointly defined scope.
The checklist is available for download on our website www.schmidttechnology.de.
In the SCHMIDT® Standard, 5 measuring points are fixed for each measuring range. These SCHMIDT® standard calibration points are:
| Measuring range end value [wN in m/s] | SCHMIDT® standard calibration points (3) [wN in m/s] | ||||
|---|---|---|---|---|---|
| 1 | 0.20 | 0.36 | 0.45 | 0.54 | 1.00 |
| 2.5 | 0.25 | 0.63 | 1.25 | 1.88 | 2.50 |
| 5 | 0.50 | 1.25 | 2.50 | 3.75 | 5.00 |
| 10 | 1.00 | 2.50 | 5.00 | 7.50 | 10.00 |
| 20 | 2.00 | 5.00 | 10.00 | 15.00 | 20.00 |
| 35 | 3.50 | 8.75 | 17.50 | 26.25 | 35.00 |
| Measuring range > 35 | 3.50 | 8.75 | 17.50 | 26.25 | 35.00 |
| Special measuring range up to 35 | 10 % (4) | 25 % (4) | 50 % (4) | 75 % (4) | 100 % (4) |
Instead of the 5 SCHMIDT® Standard Calibration Points you can define 5 customer specific calibration points (3) without any sur-charge.
Individual calibration points (3): Furthermore, there is the possibility for you to define up to 5 additional calibration points for an additional charge.
As standard, the conformity assessment of the results of an accredited calibration (1) is carried out following the standard decision rule “confidence level 95 %”. Deviating from this, you can also select a conformity assessment of the calibration result according to the standard decision rule “confidence level 50 %”. The conformity assessment is carried out in compliance with the guideline RL-ST-200 (Decision Rules and Statements of Conformity).
Accredited calibrations (1) are carried out at the accredited (1) SCHMIDT® Standard Measuring Point “position 72 mm” in order to also reasonably map a calibration of very short sensors.
Many SCHMIDT® Flow Sensors are equipped with a so-called auto U/I analogue output. Here, the connected burden defines whether a current signal (4 – 20 mA) or a voltage signal (0 – 10 V) is used as output signal. The calibration will be performed according to the output signal specified by you (either 4 – 20 mA or 0 – 10 V). A calibration of both analogue outputs requires 2 separate calibration processes.
Cleaning
Contamination on the sensing element of the flow sensor can lead to deviations of measured values. Flow sensors that you return for calibration are calibrated unchanged to reflect the condition of the sensor as it has been used by you recently. If any contamination is detected during the visual incoming inspection, you will be informed about this. In such cases, we will recommend to put through a professional cleaning of the sensor element. Cleaning the sensor element means a change to the flow sensor that affects the measurement result and therefore inevitably leads to a re-adjustment of the sensor
Re-adjustment
In case of cleaning the sensor element or after repair of sensor, it must be re-adjusted to the specified measuring range followed by a calibration. An adjustment is also known as a setting of the sensor and with the subsequent calibration the adjustment will be checked (measured).
In some applications, customers always require returned sensors to be calibrated, cleaned, re-adjusted and re-calibrated. We are happy to offer you this service as well.
A re-adjustment is always subject to a charge.
Change of measuring range
You have ordered a wrong measuring range or your application has changed in respect to the specified measuring range? No problem: Return the sensor and let us re-adjust it. A change of measuring range is always possible by means of a new adjustment.
Any further questions?
Do you have further questions or need support regarding flow sensors, calibration, adjustment, declaration of decontamination, service returns in general or do you need advice for a new application with flow measurement? We are at your disposal!
+49 (0) 77 24 / 8 99-198
RL-ST-220b calibration method flow accredited area
Sample Factory Calibration Certificate SS 20.400
(1) Accredited services correspond to the scope of accreditation listed in Document Annex D-K-21939-01-00. All other services do not include an accredited report and are consequently not covered by the EA MLA
(2) Corresponds to wN = 0.1 m/s to wN = 35 m/s (e.g. for calibration of thermal anemometers).
(3) In general the defined calibration points represent approximate values and cannot necessarily be hit exactly (influenced by wind tunnel control).
(4) Related to the end of the measuring range or to max. wN = 35 m/s, however, min. wN = 0.2 m/s; rounded to 2 decimal places (3).

